Upcycled Acrylic Card Tutorial

Aww yes…trash to treasure…well, to an acrylic card at least. I have been saving these clamshell cases off of various things to make acrylic cards.

They are pretty easy to make so I thought I would add a quick tutorial. Oh and FYI…for any of my friends and family reading this that aren’t into the whole crafty thing… I will gladly take any of them off your hands as well. 🙂
Step One:
Cut your acrylic into a sheet that is the size of the card you want. I used an X-acto knife, metal ruler, and self healing mat for this.

Step Two: Fold the acrylic just as you would a card. I generally don’t use a bone folder for my paper cards, but I found it to be essential to actually crease these.

At this point you should have a basic acrylic card that is ready to embellish.

Step Three: Embellish as desired!
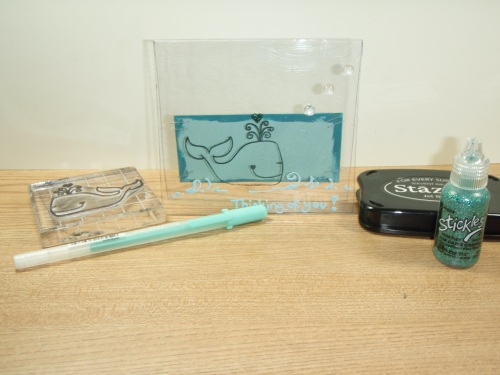
A few tips for embellishing on acrylic cards…
Adhesives: I found glue dots worked well with these, but also try being creative…stitching, eyelets, brads, and staples all work with acrylic sheets.
Ink: This is one of the harder things about acrylics. Only certain inks will stay on them. Stazon work great for stamping or inking edges. For doodling, I used Souflee pens. They worked great as well, but you have to wait until they are fully dried before touching them and they take some time to dry. They dry a different shade than the original ink as well. That is helpful for knowing when they have dried, but fyi…they will look different.
Stickles: I added a touch of stickles for some glitter as well. They do work, but they need quite a bit of drying time.
Paper: What is up with that? Isn’t it supposed to be clear? Ok…for the card to actually work as a card…paper on the inside to add a message is good. It also works to cover portions that you don’t want to see through from the cover to the inside. 🙂 I added just a strip of paper on t his one so that a message can later go inside. The message will be fully viewable unopened though. LOL!
Oh and for those keeping track…this is project number 4 for me using Queen Kat Designs whale stamp. I *heart* it! 🙂


Whale of a good idea! 😆
| Posted 15 years, 9 months agoWow! What an awesome idea!!! I wonder if you could run this through a Cricut to make shaped cards????
| Posted 15 years, 9 months agoHey Ria,
I don’t know about the cricut, but I am sure the sizzix and cuttlebug would cut it with some of the sizzix dies that are meant to be cards. That would probably be a much easier way to do it as well and you would get other shapes and designs. I think Sizzix has a die that has scalloped edges as a card. 🙂
If you try it, let me know. I would love to see it. I still don’t have a cuttlebug to try it with. lol! I’ll post it if I get one and do try it. 🙂
| Posted 15 years, 9 months agoGreat card
| Posted 15 years, 9 months agoWhat a clever idea! Love that whale stamp!
| Posted 15 years, 9 months ago